Online help (SubstSIP - SIP server)
The archive file is compressed in zip format.
Please make a suitable folder, and place all files in the folder you created with the same folder structure.
File organization
| substsip.exe | "SubstSIP" Application file. |
|---|---|
| libssl-3-x64.dll libcrypto-3-x64.dll | SSL library (64-bit edition). |
| libssl-3.dll libcrypto-3.dll | SSL library (32-bit edition). |
| server.crt server.key | The default certificate. |
Please delete each folder where the application exists.
File
| Open Phone | |
|---|---|
| Close Phone | |
| Send Packet | |
| Send Response | Manually send any response content to a SIP request packet received by the SIP server. |
| Auto test | |
| Add Register List |
Load the device registration information list file and register the device. |
| Exit | Exit the application. |
Setting
| SIP Setting | |
|---|---|
| Entry Logged-in Users | |
| Creating event data | Create an event file to register to the function button of the virtual phone. |
| Entry Vitrual Phone | |
| Setting server degug mode |
Help
| Help Topics | Open the online help page. |
|---|---|
| Choose Language |
Select the display language of the application as "English" or "Japanese". |
| About Application |
Displays application version information. 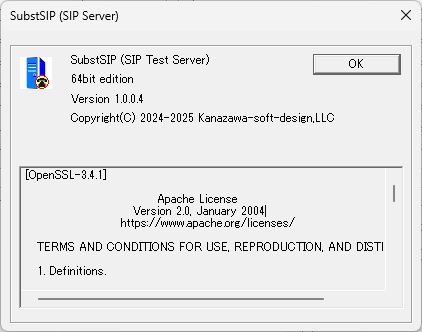
|
| To Keep Using ... |
Enter the license key. |
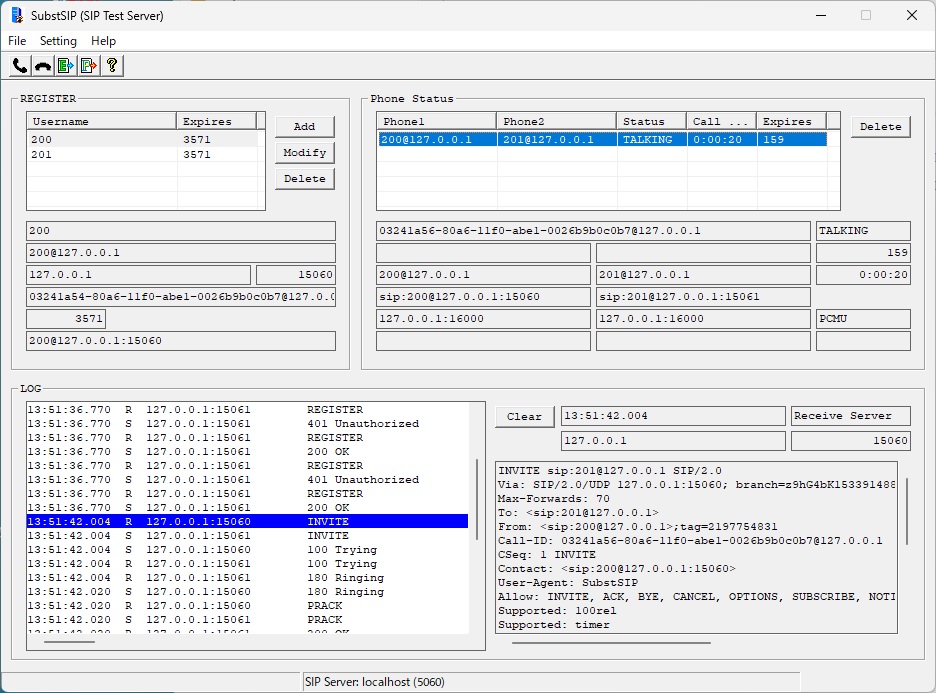
REGISTER
Displays the devices registered on the SIP server.
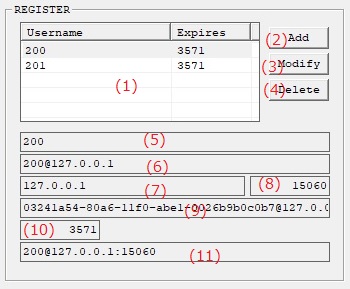
| (1) | Registered phone list |
Displays a list of phones registered on the SIP server. |
| (2) | [Add]button |
Manually register the device to the SIP server. |
| (3) | [Modify]button |
Manually edit the registration information selected in the registered device list. |
| (4) | [Delete]button |
Manually delete the registration information selected in the registered device list. |
Displays the registration information for the device selected in the registered device list.
| (5) | Display name |
Displays the display name of the registered device. |
| (6) | SIP-URI |
Displays the SIP-URI registered by the registered terminal. |
| (7) | Registered phone address |
Displays the IP address or domain name of the registered phone. |
| (8) | Port number of the registered phone |
Displays the port number of the registered phone. |
| (9) | Call-ID of the REGISTER command when registering |
The Call-ID is displayed when the phone is registered using the REGISTER command. |
| (10) | Time remaining for registration validity |
Displays the remaining validity period of the registered phone. |
| (11) | 'Contact' of registered phone |
Displays the 'Contact' value of the registered phone. |
Phone Status

Displays the connection information of devices connected via the SIP server.
| (1) | Call Information List |
Displays a list of calls that are in progress via the SIP server. |
| (2) | [Delete]button |
Manually delete any connection information that remains in the connection information list. |
| (3) | Call-ID |
Displays the Call-ID of the active call. |
| (4) | Status |
Shows the call status |
| (5) | Display name |
Displays the display names of phone 1 and phone 2. |
| (6) | Session Time |
Displays the remaining time on the session timer. |
| (7) | SIP-URI |
Displays the SIP-URI of phone 1 and phone 2. |
| (8) | Talk Time |
Displays the duration of the call from the start. |
| (9) | SIP port address |
Displays the SIP port addresses of phone 1 and phone 2. |
| (10) | Audio RTP |
Displays the audio RTP port address and codec type of phone 1 and phone 2. |
| (11) | Video RTP |
Displays the video RTP port address and codec type of phone 1 and phone 2. |
LOG
Displays the log of SIP packets sent and received by the SIP server.
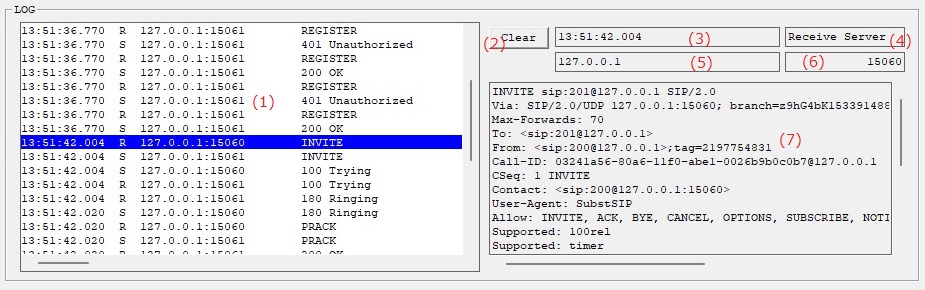
| (1) | Packet Log List |
Displays a list of logs of SIP packets sent and received by the SIP server. |
| (2) | [Clear]button |
Clear the packet log list. |
| (3) | Timestamp |
Indicates the time when the packet was sent or received. |
| (4) | Send/Receive |
Indicates whether the packet is sent to or received from the SIP server. |
| (5) | Destination address |
The IP address of the destination of the packet. |
| (6) | Destination Port Number |
The port number to which the packet is sent or received. |
| (7) | Packet Contents |
Displays the message content of the packet. |
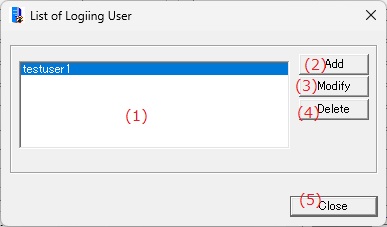
| (1) | List of Logiing User |
Displays a list of user names to use for server authentication. |
| (2) | [Add]button |
Register a new login user. |
| (3) | [Modify]button |
Edit the information of the user selected in the login user list. |
| (4) | [Delete]button |
Deletes the user information selected in the login user list. |
| (5) | [Close]button |
Close the dialog. |
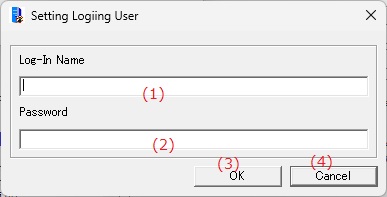
| (1) | Log-In Name |
Enter the username to use for server authentication. |
| (2) | Password |
Enter the password to use for server authentication. |
| (3) | [OK]button |
Gets the input and closes the dialog. |
| (4) | [Cancel]button |
Cancels the input and closes the dialog. |
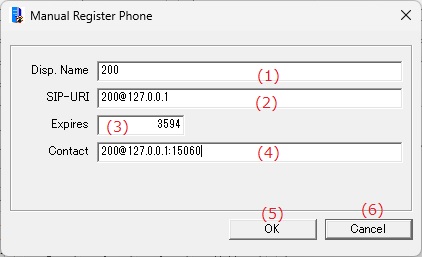
| (1) | Disp. Name |
Enter the display name of the device you want to register on the server. |
| (2) | SIP-URI |
Enter the SIP-URI of the device to be registered on the server. |
| (3) | Expires |
Enter the validity period for the server registration. |
| (4) | Contact |
Enter the contacts to be registered on the server. |
| (5) | [OK]button |
Gets the input and closes the dialog. |
| (6) | [Cancel]button |
Cancels the input and closes the dialog. |
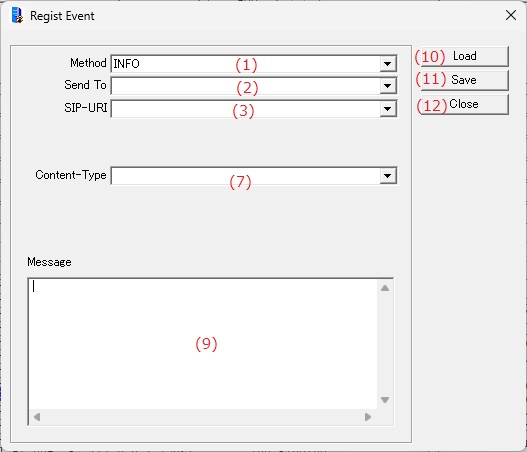
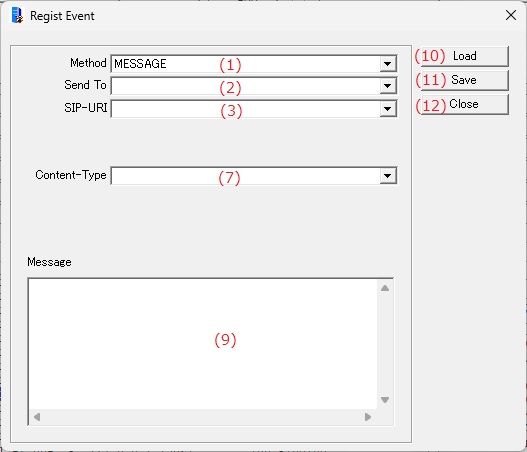
Creates various event messages and saves them to files.
The created event data is used for event notifications or function buttons on the virtual phone.
SUBSCRIBE

NOTIFY
INFO
MESSAGE
PUBLISH
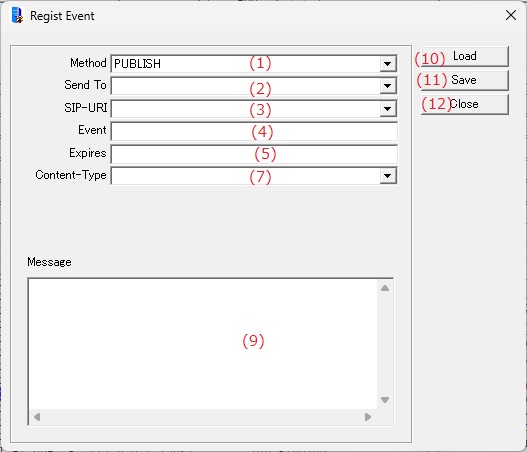
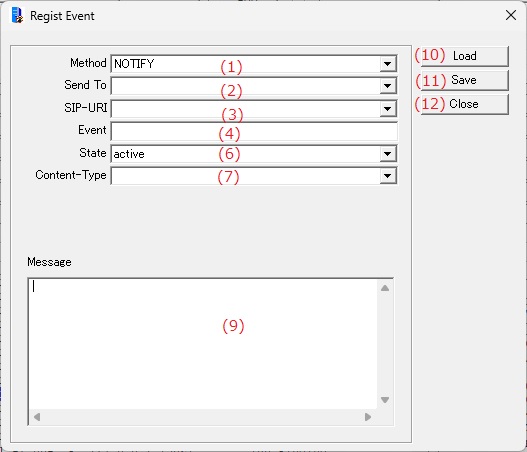
| (1) | Method |
Select the method of the packets to be notified. |
| (2) | Send To |
Enter the address of the destination terminal to which the notification packet will be sent. |
| (3) | SIP-URI |
Enter the SIP-URI that indicates the destination phone. |
| (4) | Event |
Enter the 'Event' field when the notification method is SUBSCRIBE, NOTIFY, or PUBLISH. |
| (5) | Expires |
If the notification method is SUBSCRIBE or PUBLISH, enter the validity period of the event to be added to the 'Expires' field. |
| (6) | State |
Select the event status to be added to the 'Subscription-State' field when the notification method is NOTIFY. |
| (7) | Content-Type |
Enter the data format of the message body to be added to the 'Content-Type' field. |
| (8) | Accept |
Enter the 'Accept' field. |
| (9) | Message |
Enter the event message to be notified. |
| (10) | [Load]button |
Loads a saved event data file. |
| (11) | [Save]button |
Saves the current input to an event data file. |
| (12) | [Close]button |
Close the dialog. |
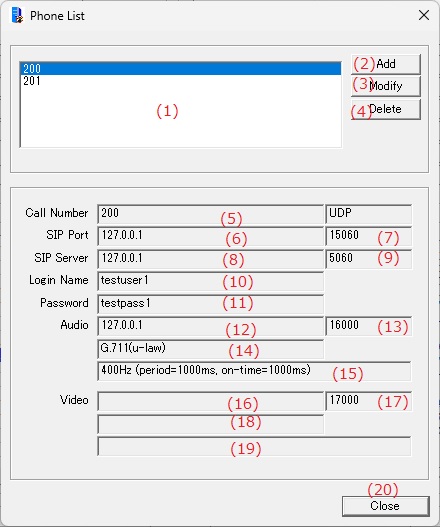
| (1) | Virtual Phone List |
Displays a list of registered virtual phones. |
| (2) | [Add]button |
Register a new virtual phone. |
| (3) | [Modify]button |
Edit the registration details of the virtual phone selected in the Virtual phone List. |
| (4) | [Delete]button |
Deletes the registration details of the virtual phone selected in the virtual phone list. |
Displays the registration details of the virtual phone selected in the Virtual phone List.
| (5) | Call Number |
Displays the extension number or user name of the virtual phone. |
| (6) | SIP Port - Address |
Displays the IP address or domain name of the SIP port of the virtual phone. |
| (7) | SIP Port - Port number |
Displays the port number of the virtual phone's SIP port. |
| (8) | SIP Server - Address |
Displays the IP address or domain name of the SIP server to which the virtual phone connects. |
| (9) | SIP Server - Port number |
Displays the port number of the SIP server to which the virtual phone connects. |
| (10) | Login Name |
Displays the user name to be used when receiving an authentication request from the SIP server. |
| (11) | Password |
Displays the password used when receiving an authentication request from the SIP server. |
| (12) | Audio RTP - Address |
Displays the IP address of the RTP port used for audio RTP. |
| (13) | Audio RTP - Port Number |
Displays the RTP port number used for audio RTP. |
| (14) | Audio RTP - Codec |
Displays the codec used by the audio RTP port. |
| (15) | Audio RTP - Send Data |
Displays output data such as files sent from the audio RTP port. |
| (16) | Video RTP - Address |
Displays the IP address of the RTP port used for video RTP. |
| (17) | Video RTP - Port Number |
Displays the RTP port number used for video RTP. |
| (18) | Video RTP - Codec |
Displays the codec used by the video RTP port. |
| (19) | Video RTP - Send Data |
Displays the file to be sent from the video RTP port. |
| (20) | [Close]button |
Close the dialog. |
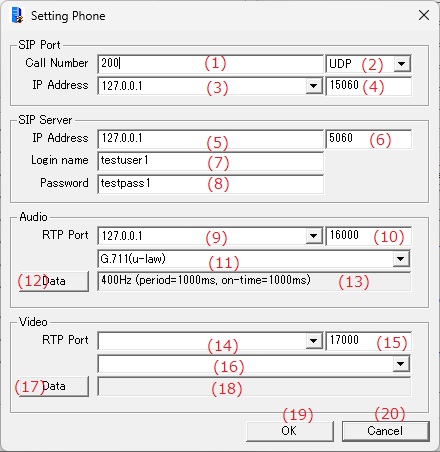
| (1) | Call Number |
Enter the extension number or user name of the virtual phone. |
||||||||
| (2) | Protocol |
Select the protocol for the virtual phone from UDP/TCP/TLS. |
||||||||
| (3) | Address |
Enter the virtual phone IP address or domain name. |
||||||||
| (4) | Port number |
Enter the port number for the virtual phone. |
||||||||
| (5) | SIP Server - Address |
Enter the IP address or domain name of the SIP server. |
||||||||
| (6) | SIP Server - Port number |
Enter the port number of the SIP server. |
||||||||
| (7) | Login name |
Enter the user name to be used when receiving an authentication request from the SIP server. |
||||||||
| (8) | Password |
Enter the password to be used when receiving an authentication request from the SIP server. |
||||||||
| (9) | Audio RTP Port - Address |
Enter the IP address of the RTP port to be used for audio RTP. |
||||||||
| (10) | Audio RTP Port - Port number |
Enter the RTP port number to be used for audio RTP.
Please specify an even number for the RTP port number. |
||||||||
| (11) | Audio RTP Port - Codec |
Select the codec to be used for the audio RTP port. |
||||||||
| (12) | [Data]button | |||||||||
| (13) | Send Data |
Displays the file name to be sent from the audio RTP port. |
||||||||
| (14) | Video RTP Port - Address |
Enter the IP address of the RTP port to be used for video RTP. |
||||||||
| (15) | Video RTP Port - Port number |
Enter the RTP port number to be used for video RTP.
Please specify an even number for the RTP port number. |
||||||||
| (16) | Video RTP Port - Codec |
Select the codec to be used for the video RTP port. |
||||||||
| (17) | [Data]button | |||||||||
| (18) | Send Data |
Displays the file name to be sent from the video RTP port. |
||||||||
| (19) | [OK]button |
Gets the input and closes the dialog. |
||||||||
| (20) | [Cancel]button |
Cancels the input and closes the dialog. |
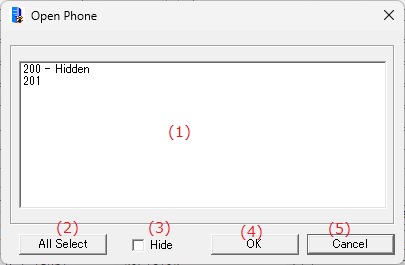
Open the virtual phone you registered.
| (1) | Phone List |
Displays a list of registered virtual phones. |
| (2) | [All Select]button |
Selects all virtual phones in the phone list. |
| (3) | Hide |
Opens a hidden virtual phone window. |
| (4) | [OK]button |
Opens all selected virtual phones. |
| (4) | [Cancel]button |
Closes the dialog without opening a virtual phone. |
Closes an open virtual phone call.
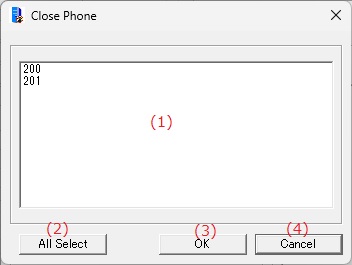
| (1) | Phone List |
Displays a list of open virtual phones. |
| (2) | [All Select]button |
Selects all virtual phones in the phone list. |
| (3) | [OK]button |
Closes all selected virtual phones. |
| (4) | [Cancel]button |
Closes the dialog without closing the virtual phone. |
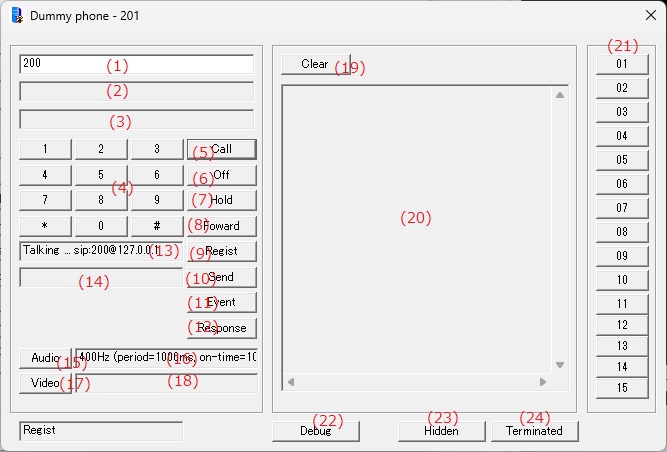
| (1) | Dial Input |
Enter the phone number or SIP-URI to connect to. |
| (2) | 'To' field input |
Change the contents of the 'To' field of the INVITE command sent by the virtual phone. |
| (3) | 'From' field input |
Change the contents of the 'From' field of the INVITE command sent by the virtual phone. |
| (4) | Dial Pad |
Enter the phone number to connect to. |
| (5) | [Call]button |
An INVITE command will be sent to the phone number or SIP-URI entered in "Dial Input". |
| (6) | [Off]button |
Disconnects the current call. |
| (7) | [Hold]button |
If there is an active call, it will be placed on hold. |
| (8) | [Foward]button |
Transfers a call on hold on line 1 to line 2. |
| (9) | [Regist]button |
It performs a registration request to the SIP server. |
| (10) | [Send]button |
Sends arbitrary packets from the virtual phone to other phone. |
| (11) | [Event]button |
An event packet is sent from the virtual phone to another phone. |
| (12) | [Response]button |
Manually send any response to a SIP command received by the virtual phone. Intercepted SIP commands will be treated as "not received" by the virtual phone. |
| (13) | Line1 Status |
Displays the connection status of telephone line 1. |
| (14) | Line2 Status |
Displays the connection status of telephone line 2. |
| (15) | [Audio]button | |
| (16) | Audio Data |
Displays the file name output from the audio RTP port. |
| (17) | [Video]button | |
| (18) | Video Data |
Displays the file name output from the video RTP port. |
| (19) | [Clear]button |
Clears the contents displayed in the message box. |
| (20) | Message box |
Displays the message body of the NOTIFY, PUBLISH, INFO and MESSAGE commands received by the virtual phone. |
| (21) | [Function]button |
Send SIP request commands such as NOTIFY commands according to the file created in "Creating event data." |
| (22) | [Debug]button |
Opens the Virtual Phone Debugging Extensions Settings dialog. |
| (23) | [Hidden]button |
Hides the virtual phone dialog. |
| (24) | [Terminated]button |
Stops the virtual phone and closes the dialog. |
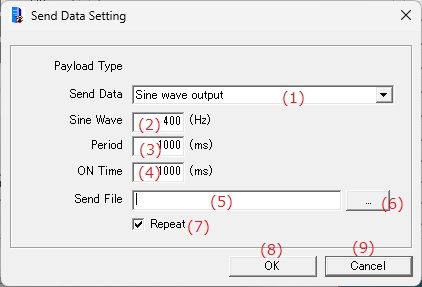
| (1) | Send Data |
Select the type of data to be sent from the RTP port from the following.
For video RTP
|
||||||
| (2) | Sine Wave |
Enter the frequency of the sine wave to be generated when the transmission data type is sine wave output. |
||||||
| (3) | Period |
Enter the repeating period of the sine wave to be generated when the transmission data type is sine wave output. |
||||||
| (4) | ON Time |
When the transmission data type is sine wave output, enter the "signal present" time of the repeating cycle of the sine wave to be generated. |
||||||
| (5) | Send File |
Enter the file name to be sent when the data type is file transmission. |
||||||
| (6) | ... (Reference) |
When the transmission data type is file transmission, select the file name to be sent from the file list. |
||||||
| (7) | Repeat |
If the data type is file transmission, the file will be sent repeatedly. |
||||||
| (8) | [OK]button |
Captures the input and closes the dialog. |
||||||
| (9) | [Cancel]button |
Cancels the input and closes the dialog. |
Sends various event messages to the specified phone.
SUBSCRIBE
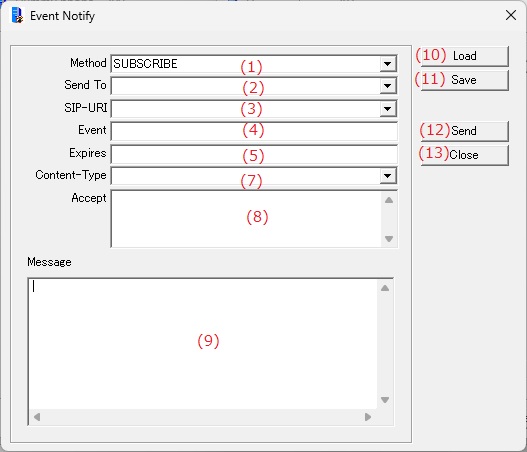
NOTIFY

INFO
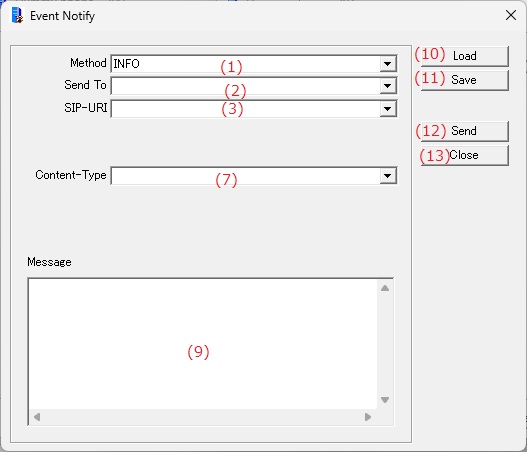
MESSAGE
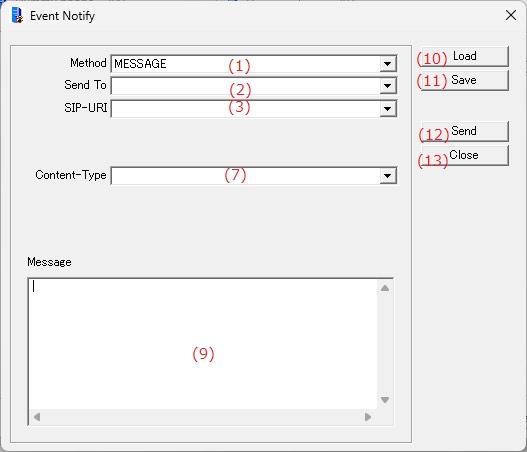
PUBLISH
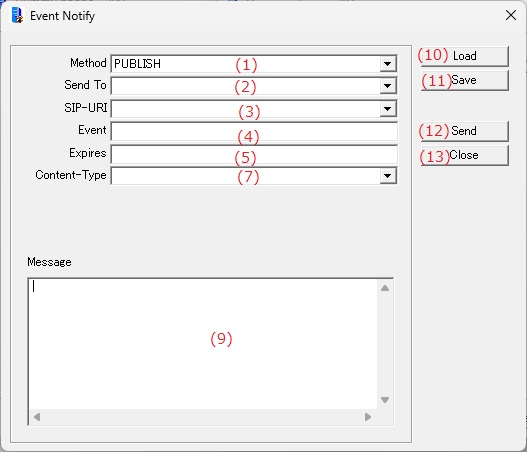
| (1) | Method |
Select the method of the packets to be notified. |
| (2) | Send To |
Enter the address of the destination terminal to which the notification packet will be sent. |
| (3) | SIP-URI |
Enter the SIP-URI that indicates the destination phone. |
| (4) | Event |
Enter the 'Event' field when the notification method is SUBSCRIBE, NOTIFY, or PUBLISH. |
| (5) | Expires |
If the notification method is SUBSCRIBE or PUBLISH, enter the validity period of the event to be added to the 'Expires' field. |
| (6) | State |
Select the event status to be added to the 'Subscription-State' field when the notification method is NOTIFY. |
| (7) | Content-Type |
Enter the data format of the message body to be added to the 'Content-Type' field. |
| (8) | Accept |
Enter the 'Accept' field. |
| (9) | Message |
Enter the event message to be notified when the notification method is NOTIFY, PUBLISH, INFO, or MESSAGE. |
| (10) | [Load]button |
Loads a saved event data file. |
| (11) | [Save]button |
Saves the current input to an event data file. |
| (12) | [Send]button |
Sends an event command packet. |
| (13) | [Close]button |
Close the dialog. |
Any message can be sent to a specific terminal and SIP server.
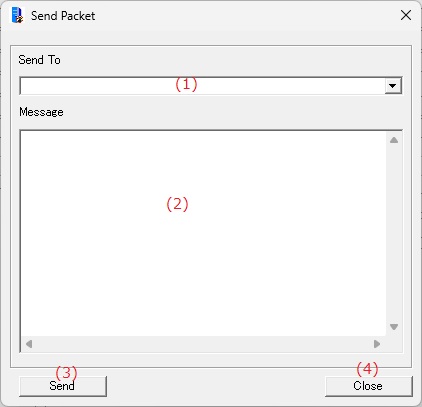
| (1) | Send To |
Enter the destination address and port number of the arbitrary packet. |
| (2) | Message |
Enter the content of the arbitrary packet to be sent. |
| (3) | [Send]button |
The message entered will be sent to the destination specified in 'Send-To'. |
| (4) | [Close]button |
Close the dialog. |
When you want to return an arbitrary error response to a specific SIP request, you can intercept the SIP request packet and manually send a response message.
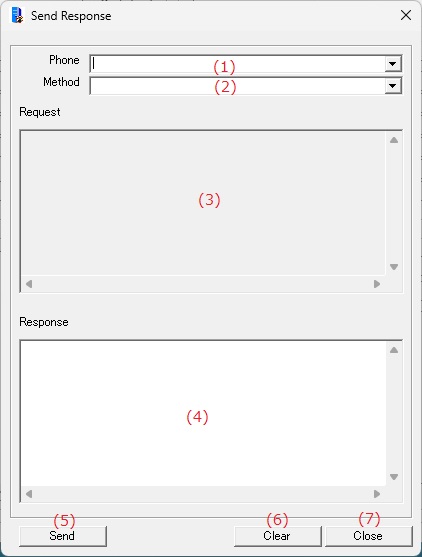
| (1) | Phone |
Sets the source phone of the SIP request packet. |
| (2) | Method |
Set the SIP request method to intercept. |
| (3) | Request |
Displays the contents of the intercepted SIP request packet. |
| (4) | Response |
Enter the content of the SIP response packet to be sent. |
| (5) | [Send]button |
The contents of the entered SIP response packet are sent back to the party that sent the SIP request. |
| (6) | [Clear]button |
Discards intercepted SIP request packets. |
| (7) | [Close]button |
Close the dialog. |
SIP server configuration information.
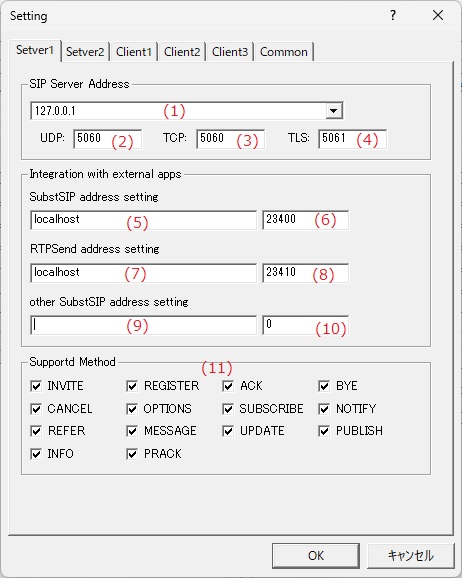
SIP Server Address
| (1) | SIP Server Address |
Enter the IP address of the SIP server that this application will provide to your SIP phone. |
| (2) | UDP port number |
Enter the port number for UDP connection of the SIP server that this application provides to the SIP terminal. |
| (3) | TCP port number |
Enter the port number for TCP connection of the SIP server that this application provides to the SIP terminal. |
| (4) | TLS port number |
Enter the port number for TLS connection of the SIP server that this application provides to the SIP terminal. |
Integration with external apps
| (5) | SubstSIP Address |
Enter the IP address of this application to communicate with the application "RTPSend". |
| (6) | SubstSIP Port number |
Enter the port number of this application to communicate with the application "RTPSend". |
| (7) | RTPSend Address |
Enter the IP address of the "RTPSend" application that sends and receives RTP. |
| (8) | RTPSend Port number |
Enter the port number for the application "RTPSend". |
| (9) | other SustSIP address setting |
Enter the IP address of another "SubstSIP" when working in conjunction with another "SubstSIP". |
| (10) | other SubstSIP port number |
Enter the port number of another "SubstSIP" when working in conjunction with another "SubstSIP". |
| (11) | Supportd Method |
Select the methods that your SIP server supports. |
SIP server setting information (continued)
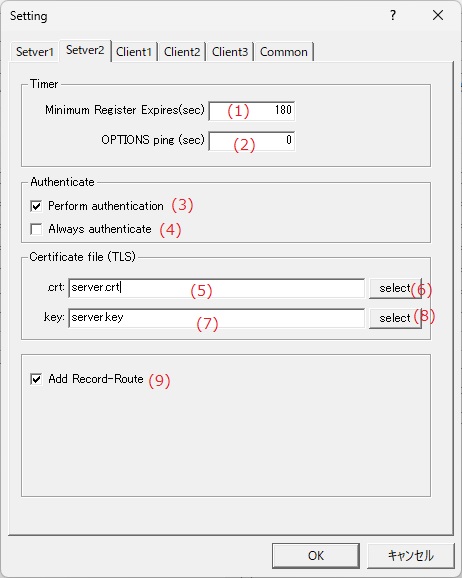
Timer
| (1) | Minimum Register Expires |
Enter the minimum validity period when registering a terminal with the SIP server using the REGISTER command. |
| (2) | OPTIONS ping |
The OPTIONS command is sent at regular intervals to terminals registered on the SIP server. |
Authenticate
| (3) | Perform authentication |
Digest authentication is performed when registering a terminal with the SIP server using the REGISTER command. |
| (4) | Always authenticate |
Even if the device is registered with the SIP server, an authentication request is required when starting a connection. |
Certificate file (TLS)
| (5) | .crt |
Specify a certificate file with the .crt extension. |
| (6) | [select]button |
Specify the certificate file with the .crt extension from the file selection dialog. |
| (7) | .key |
Specify a certificate file with the .key extension. |
| (8) | [select]button |
Specify the certificate file with the .key extension from the file selection dialog. |
| (9) | Add Record-Route |
The SIP server adds a 'Record-Route' field to the INVITE command that is passed through it. |
SIP client(virtual phone) setting information.
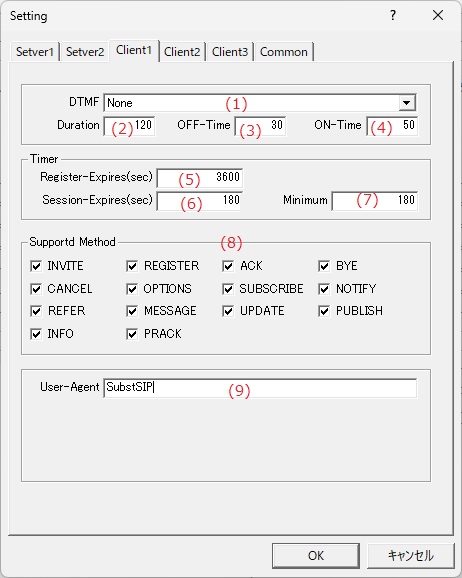
DTMF
| (1) | DTMF |
Select the DTMF output format from the following.
|
||||||||
| (2) | Duration |
Enter the total duration of the DTMF tone, including any silent parts. |
||||||||
| (3) | OFF-Time |
Enter the amount of silence at the start of the DTMF tone. |
||||||||
| (4) | ON-Time |
Enter the duration of the DTMF tone's voiced portion. |
Timer
| (5) | Register-Expires |
Enter the validity period for registering with the SIP server. |
| (6) | Session-Expires |
Enter the session timer timeout period. |
| (7) | Minimum |
Enter the minimum value for the session timer. |
| (8) | Supportd Method |
Select the method that the virtual phone supports. |
| (9) | User-Agent |
Enter the string for the 'User-Agent' field of the virtual phone. |
SIP client(virtual phone) setting information (continued)
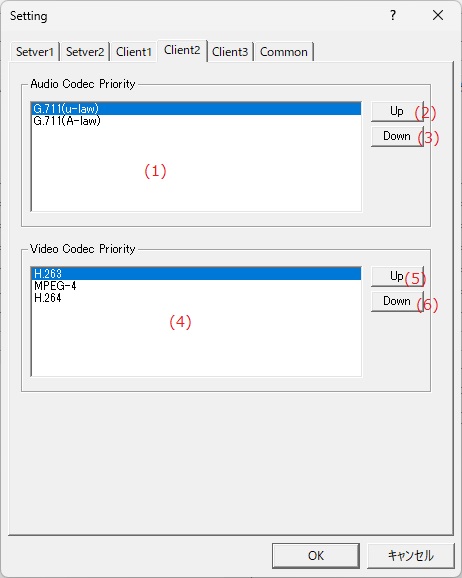
Audio Codec Priority
| (1) | Audio Codec List |
List the supported audio codecs in order of priority. |
| (2) | [Up]button |
Increases the priority of the codec selected in the audio codec list by one. |
| (3) | [Down]button |
Decreases the priority of the codec selected in the audio codec list by one position. |
Video Codec Priority
| (4) | Video Codec List |
List supported video codecs in order of priority. |
| (5) | [Up]button |
Increases the priority of the codec selected in the video codec list by one. |
| (6) | [Down]button |
Decreases the priority of the codec selected in the video codec list by one. |
SIP client(virtual phone) setting information (continued)
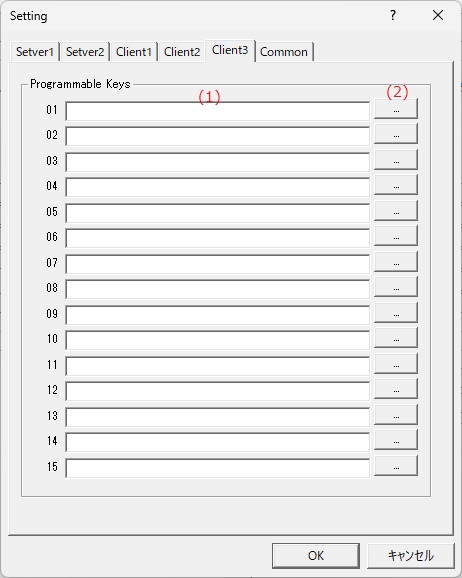
Function Keys
| (1) | Event data file name |
Specify the event data file to be sent when the function key is pressed. |
| (2) | [...(Reference)]button |
Select the event data file from the file selection dialog. |
Timer
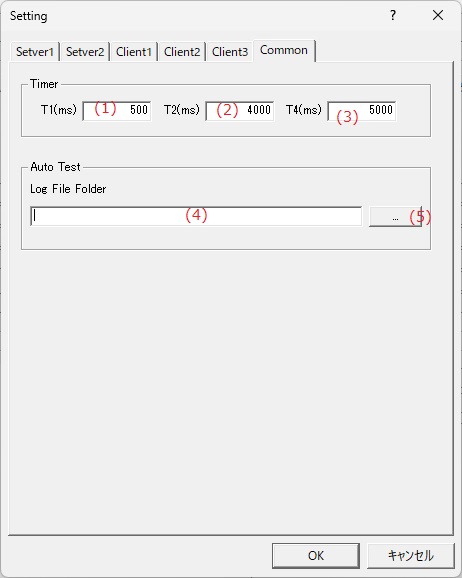
| (1) | T1(ms) |
Enter the T1 timer value. |
| (2) | T2(ms) |
Enter the T2 timer value. |
| (3) | T4(ms) |
Enter the T4 timer value. |
Auto Test
| (4) | Log file folder |
Specify the folder where the log file is saved when the automated test is executed. |
| (5) | [...(Reference)]button |
Select the folder where you want to save the log file from the folder selection dialog. |
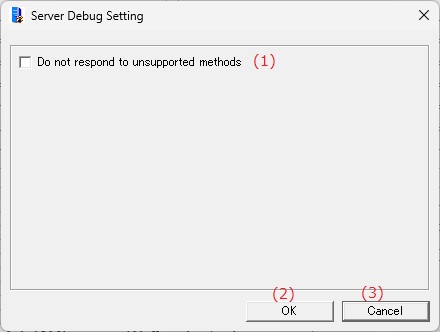
| (1) | Do not respond to unsupported methods |
Prevents the SIP server from returning a response when it receives an unsupported method. |
| (2) | [OK]button |
The settings are reflected and the dialog box is closed. |
| (3) | [Cancel]button |
Cancel the settings and close the dialog. |
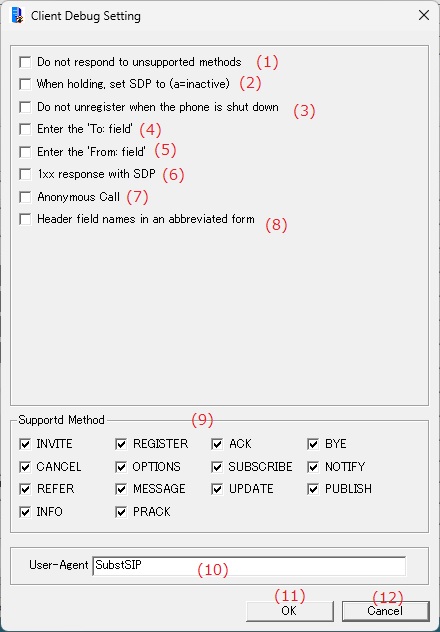
| (1) | Do not respond to unsupported methods |
Prevents the virtual phone from returning a response when it receives an unsupported method. |
| (2) | When holding, set SDP to (a=inactive) |
When the virtual phone puts the line on hold, it replaces "a=sendonly" with "a=inactive" that is added to the SDP information of the INVITE or UPDATE packet. |
| (3) | Do not unregister when the phone is shut down |
Prevents removing registration from SIP server when terminating virtual phone. |
| (4) | Enter the "To field" |
Replaces the "To" field of the INVITE request sent from the virtual phone with the specified string. |
| (5) | Enter the "Form field" |
Replaces the "From" field of the INVITE request sent from the virtual phone with the specified string. |
| (6) | 1xx response with SDP |
The virtual phone adds SDP to the 1xx response to the INVITE request. |
| (7) | Anonymous Call |
INVITE requests sent from the virtual phone are sent with anonymous settings. |
| (8) | Header field names in an abbreviated form |
If an abbreviation is defined for a field in a SIP request command, the abbreviation is used. |
| (9) | Supportd Method |
Select the method that the virtual phone supports. |
| (10) | User-Agent |
Enter the string for the 'User-Agent' field of the virtual phone. |
| (11) | [OK]button |
The settings are reflected and the dialog box is closed. |
| (12) | [Cancel]button |
Cancel the settings and close the dialog. |
Run automated tests using virtual phones.
| (1) | Auto Test List | Displays the automated tests to be performed. |
| (2) | Virtual Phone List | Displays a list of the status of open virtual phones. |
| (3) | Auto Test Logs | Displays the execution log of the automated tests. |
| (4) | [Load]button | Loads saved automated test data. |
| (5) | [追加]button | Adds a new test command to the end of the current automated test list. |
| (6) | [Modify]button | Changes the test command selected in the Auto Test list. |
| (7) | [Delete]button | Deletes the selected test command from the automated test list. |
| (8) | [Up]button | Moves the selected test command up one position in the automated test list. |
| (9) | [Down]button | Moves the selected test command down one step in the automated test list. |
| (10) | [Clear]button | Clear the automated test list. |
| (11) | [Save]button | Saves the contents of the automated test list to a file. |
| (12) | [Start]button | Starts the automated test run. |
| (13) | [Stop]button | Stops any automated tests currently running. |
| (14) | Repeat | Repeats the contents of the automated test list. |
| (15) | Save LOG | Saves the automated test execution log to a file. |
| (16) | [Close]button | Close the dialog. |
Set the test to be performed.
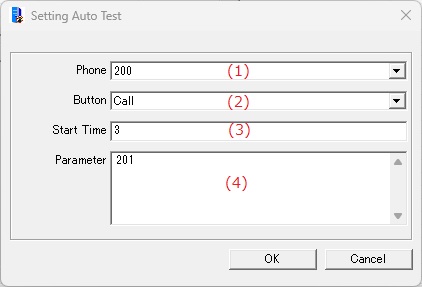
| (1) | Phone | Set the extension number of the virtual phone on which you want to run the test. |
| (2) | Button | pecifies the button to press on the virtual phone. |
| (3) | Start Time | Specify the time to run the test. |
| (4) | Parameter |
Specify the extension number when the call button is pressed. |
Set the display language of the application.
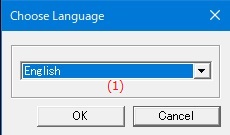
| (1) | Choose Language |
Select the display language of the application from the following languages.
|
Enter the application license key.
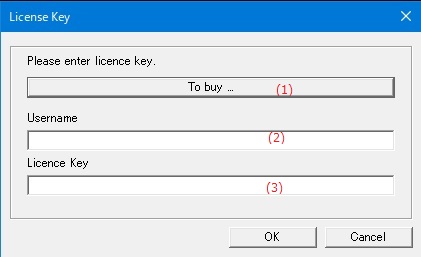
| (1) | [To Buy ...] button/td> | Displays the homepage where you can purchase the license key. |
| (2) | Username | Enter the user name to register the license. |
| (3) | Licence key | Enter the license key you purchased. |