Online help (Multi Port Terminal 2)
The archive file is compressed in zip format.
Please make a suitable folder, and place all files in the folder you created with the same folder structure.
File organization
| mport2.exe | "Multi Port Terminal 2" Application file. |
|---|---|
| libssh2.dll | SSH2 Library file. |
Please delete each folder where the application exists.
File
| Open Serial Port | |
|---|---|
| Open Parallel Port | |
| Open Network Port | |
| Open USB Port | |
| Close | |
| Communication Setting | |
| Terminal Setting | |
| Exit | Exit the application. |
Edit
| Copy | The selected range is copied, and it preserves it in the clipboard. |
|---|---|
| Paste | The data of the clipboard is transmitted from the communication port. |
| All Select | All the texts displaying it in the console are made a selective state. |
| All Copy | All the texts displaying it in the console are copied, and it preserves it in the clipboard. |
| Erase | All the texts displaying it in the console are deleted. |
| Input Prohibition | The input from the keyboard is prohibited. |
View
| Toolbar | Shows or hides the toolbar. |
|---|---|
| Status Bar | Shows or hides the status bar. |
| ANSI,Unicode(UTF-8),Unicode(UTF-16) | This specifies the character-code that the console displays. |
| Property | The property in the communication port is displayed. |
Tool
| File Transfer |
Send the file from the communication device.
|
|---|---|
| File Transfer - Pause | The file transmission is temporarily interrupted. |
| File Transfer - Continue | The file transmission that stops temporarily is restarted. |
| File Transfer - Stop | The file transmission is discontinued. |
| Save Receive Data | |
| Discontinued The Save of Receive Data | The file preservation of receive data is interrupted and it closes a file. |
| Set Bypass | |
| Device ID |
Device ID character string is read from the printer connected with a parallel port. |
| IEEE1284 Negotiation |
A re-negotiation is done in the IEEE1284 mode for which the IEEE1284 mode of a parallel port is specified with [Communication Setting] - [Parallel Port] - [Mode]. |
| Configuration Discriptor |
The device descriptor and the configuration descriptor are read from the connected USB device. |
Window
| Tile Horizonta | The window is arranged right and left and displayed. |
|---|---|
| Tile Vertical | The window is arranged up and down and displayed. |
| Cascade | The window is displayed by the cascade. |
| All Close | All windows are closed. |
| Window 1, 2, ... | The specified window is displayed. |
Help
| Help Topics | Open the online help page. |
|---|---|
| Choose Language |
Select the display language of the application as "English" or "Japanese". |
| About Multi Port Terminal 2 |
Displays application version information. 
|
| To Keep Using ... |
Enter the license key. |
It communicates by using the serial port.
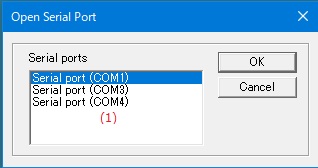
| (1) | Serial ports | The connected serial port is specified from among the list. |
note: The serial port is opened without selecting the port by the dialog when there is only one serial port.
It communicates by using the parallel port.
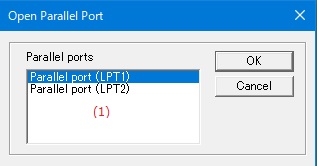
| (1) | Parallel ports | The connected parallel port is specified from among the list. |
note: The parallel port is opened without selecting the port by the dialog when there is only one parallel port.
note: When a parallel port allocates it to the printer by the control panel, it is likely not to operate.
It communicates by using TCP/IP(socket).
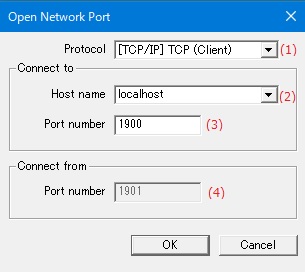
| (1) | Protocol |
The protocol is as follows.
|
||||||||
| (2) | Connect to - Host name |
Other party's host name or Internet Protocol address is specified when connecting it in the TCP client mode or the UDP mode or the SSH mode. |
||||||||
| (3) | Connect to - Port number | When connecting it in the TCP client mode or the UDP mode or the SSH mode, the port number of the other party is specified. |
||||||||
| (4) | Connect from - Host name | The host name in which the connection from the other party is waited is specified for the TCP server mode or the UDP mode. |
||||||||
| (5) | Connect from - Port number | The port number in which the connection from the other party is waited is specified for the TCP server mode or the UDP mode. |
||||||||
| (6) | Login |
In SSH mode, specify the login name to log in to the SSH server. |
||||||||
| (7) | Password |
In SSH mode, specify the password to log in to the SSH server. |
note: Since this software only controls the protocol by socket, we do not recommend sending and receiving files by UDP communication, which does not guarantee the arrival order of packets.
It communicates by using the USB port.
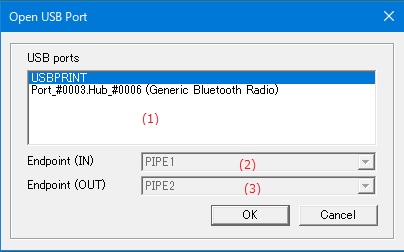
| (1) | USB ports |
The connected USB port is specified from among the displayed list. |
| (2) | Endpoint (IN) | The input EndPoint connected when there are two or more input EndPoint is specified. |
| (3) | Endpoint (OUT) | The output EndPoint connected when there are two or more output EndPoint is specified. |
Closes the open communication device.

| (1) | Connection ports | The closing port is specified from among the list. |
Send the file from the communication device.
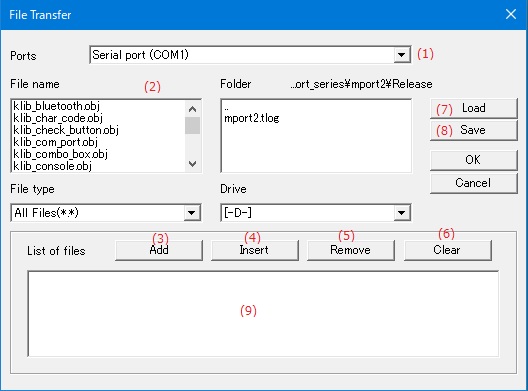
| (1) | Ports | The communication device that transmits the file is selected. |
| (2) | Select transfer file(Drive,Folder,File type,File name) | The transmitted file is selected. |
| (3) | [Add] Button | The transmission file name selected at the end of the transmission file name list is added. |
| (4) | [Insert] Button | The selected transmission file name is inserted in the cursor position of the transmission file name list. |
| (5) | [Remove] Button | The transmission file name of the cursor position of the transmission file name list is deleted. |
| (6) | [Clear] Button | The transmission file name list is cleared. |
| (7) | [Load] Button | The transmission file name list is read from the file. |
| (8) | [Save] Button | The transmission file name list is preserved in the file. |
| (9) | Transmission file name list |
Shows a list of files to send. |
Save the received data to a file.
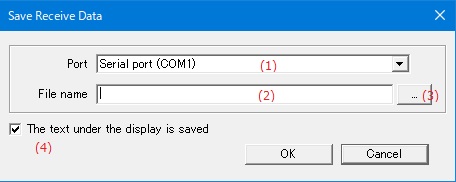
| (1) | Port | The communication port where the file is received is selected. |
| (2) | File name | The file name in which receive data is preserved is specified. |
| (3) | [...] Button | The file name in which receive data is preserved is selected from the file selection dialog. |
| (4) | The text under the display is saved | The message displayed on the console screen is preserved in the file now. |
Forwards the received data to the specified port and sends it from the forwarded port.

| (1) | Bypass port | Select the port to transfer incoming data. |
The Communication condition is set.
After the dialog is shut pushing the [OK] button, the setting is reflected.
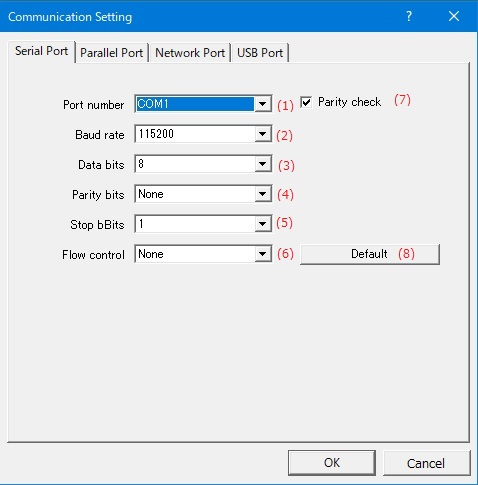
| (1) | Port number | The serial port(COM1,COM2, ...) that sets the communication condition is specified. |
| (2) | Baud rate |
The transmission rate (baud rate) is selected. |
| (3) | Data bits |
The data bit length is selected. |
| (4) | Parity bits |
The parity bit is selected. |
| (5) | Stop bBits |
The stop bit length is selected. |
| (6) | Flow control |
The method of the flow control is selected. |
| (7) | Parity check | Effective/invalidity of the parity check is selected. |
| (8) | [Default] Button | The setting of the serial port is returned to the setting of default. |
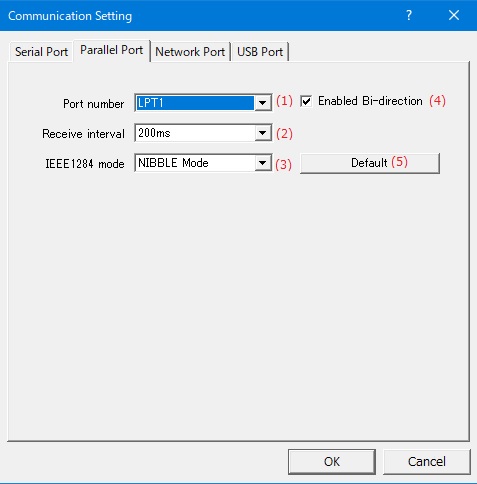
| (1) | Port number | The parallel port(LPT1,LPT2, ...) that sets the communication condition is specified. |
| (2) | Receive interval | The interval when data is received from the connected equipment is specified. |
| (3) | IEEE1284 mode |
The negotiation mode of IEEE1284 is selected. |
| (4) | Enabled Bi-direction |
Effective/invalidity of the two way communication is set. |
| (5) | [Default] Button | The setting of the parallel port is returned to the setting of default. |
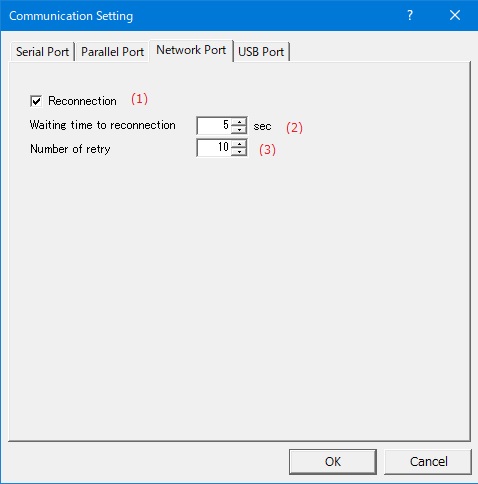
| (1) | Reconnection | It is specified whether to do the reconnection when the disconnection. |
| (2) | Waiting time to reconnection | Waiting time from doing disconnect to doing the reconnection is specified. |
| (3) | Number of retry | Number of retry when it is not possible to connect it is specified. |
note: When the device not detected automatically by an open dialog of the universal serial bus port is set by hand power, this setting is used.
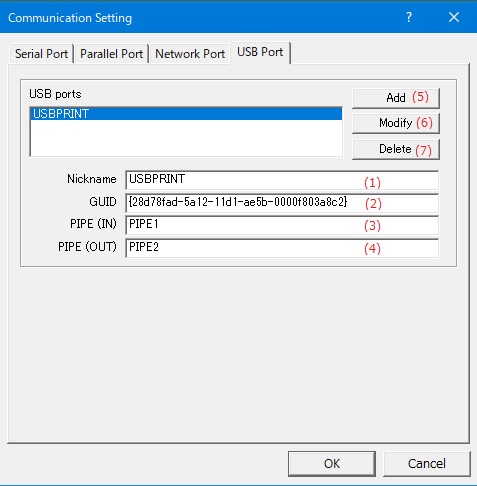
| (1) | Nickname | The name displayed in an open dialog of the USB port is specified. |
| (2) | GUID |
UUSB driver's GUID or name of the driver is specified. |
| (3) | PIPE (IN) |
Please specify the input EndPoint name (PIPE1 etc.) recognized when the USB driver opens. |
| (4) | PIPE (OUT) |
Please specify the output EndPoint name (PIPE1 etc.) recognized when the USB driver opens. |
| (5) | [Add] Button | Input "Nickname", "GUID", "PIPE (IN)", and "PIPE (OUT)" are newly registered at the end of the list. |
| (6) | [Modify] Button | The USB port at the cursor position, "Nickname", "GUID", "PIPE (IN)", and "PIPE (OUT)" are changed. |
| (7) | [Delete] Button | The USB port at the cursor position is deleted from the list. |
The console screen is set.
After the dialog is shut pushing the [OK] button, the setting is reflected.
Console
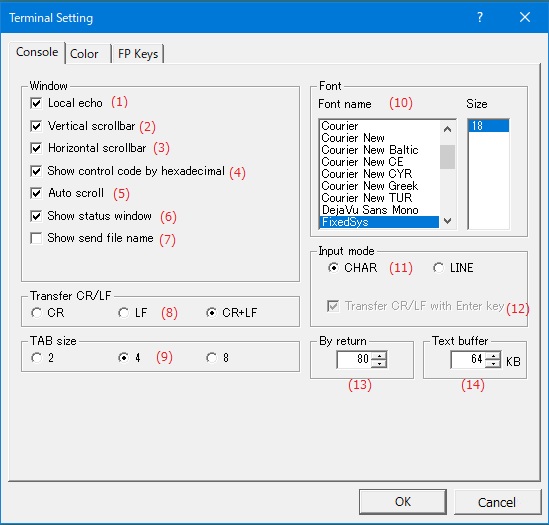
| (1) | Local echo |
Data sent from "Multi Port Terminal 2" is displayed on the console screen. |
||||||
| (2) | Vertical scrollbar | The display and non-display of a vertical scrollbar are set. |
||||||
| (3) | Horizontal scrollbar | The display and non-display of the horizontal scrollbar are set. |
||||||
| (4) | Show control code by hexadecimal |
When the control code(0x00-0x1F) is displayed, it displays it as a hexadecimal number of two digits in the form of |
||||||
| (5) | Auto scroll |
When the received data is displayed on the console screen, the screen display is scrolled like displaying the data received at the end always on the screen. |
||||||
| (6) | Show status window |
It is specified whether to display the communication status of the console screen most below.
|
||||||
| (7) | Show send file name |
Specifies whether to display the file name sent on the console screen when the file transmission is completed. |
||||||
| (8) | Transfer CR/LF |
The line feed code when transmitting is specified.
|
||||||
| (9) | Send Ctrl-C |
When Ctrl+"C" is entered from the keyboard, "0x03" is sent as the transmission data. |
||||||
| (10) | TAB size | The number of characters of TAB codes(0x09 '\t') included in the data displayed on the console screen is specified. |
||||||
| (11) | Font name,Size | The font name of the font used for the display of the console screen and the height of the character are specified. |
||||||
| (12) | CHAR,LINE |
The key input method from the console screen is specified.
When the connected equipment can correct the inputting error etc. with BS (back space) etc. , the CHAR mode is used. It is convenient to use the LINE mode when the input mistake cannot be done. |
||||||
| (13) | Transfer CR/LF with Enter key |
Whether the line feed code is added when the [Enter] key is pushed when Japanese word input method is "LINE Mode" is specified. |
||||||
| (14) | By return |
The number of turn characters of one line is specified. |
||||||
| (15) | Text buffer | The size of the buffer where the text displayed on the console screen is stored is specified. |
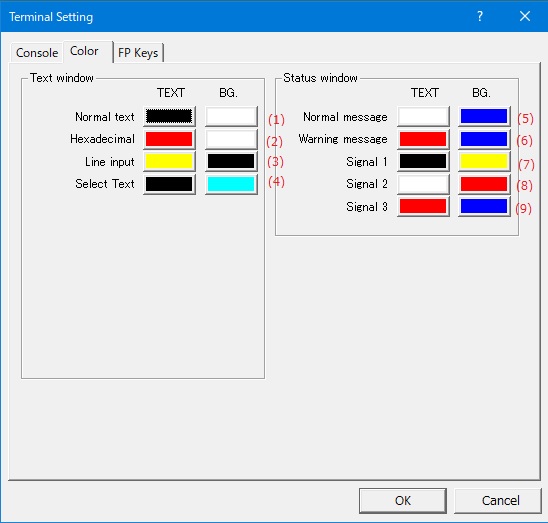
| (1) | Normal text | The character color(TEXT) and the background color(BG.) of the text displayed on the console screen are specified. |
| (2) | Hexadecimal | When "Show control code by hexadecimal" is effective, the character color and the background color of the control code(0x00 - 0x1F) are specified. |
| (3) | Line input | When the input mode is "LINE" mode, the character color and the background color of the input string are specified. |
| (4) | Select Text | The character color and the background color of the text under the selection are specified. |
| (5) | Normal message | The character color and the background color of the text displayed in the status window are specified. |
| (6) | Warning message | The character color and the background color of the alert message displayed in the status window are specified. |
| (7) | Signal 1 | The character color and the background color when the signal wire used by the status display of a serial port or a parallel port is "Hi" are specified. |
| (8) | Signal 2 | The character color and the background color when the signal wire used by the status display of a serial port or a parallel port is "Lo" are specified. |
| (9) | Signal 3 | The character color and the background color of the error used by the status display of the serial port are specified. |
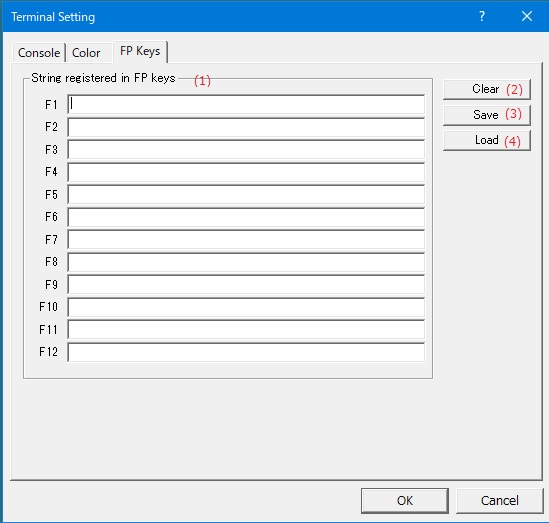
| (1) | String registered in FP keys (F1, F2, ... F12) |
The character string allocated from F1 in F12 is registered.
|
||||||||||||||||||||
| (2) | Enable assignment to control keys | Enables assignment of strings to control keys |
||||||||||||||||||||
| (3) | String assigned in Control keys |
Register the string to be sent for special keys on the keyboard, such as the arrow keys. |
||||||||||||||||||||
| (4) | [Clear] Button | The registration of the character string allocated to the FP key is cleared. |
||||||||||||||||||||
| (5) | [Save] Button | The character string allocated to the FP key is preserved in the file. |
||||||||||||||||||||
| (6) | [Load] Button | The character string allocated to the FP key is read from the file. |
Set the display language of the application.
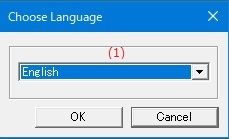
| (1) | Choose Language |
Select the display language of the application from the following languages.
|
Enter the application license key.
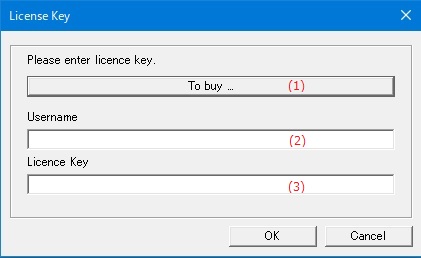
| (1) | [To Buy ...] Button | Displays the homepage where you can purchase the license key. |
| (2) | Username | Enter the user name to register the license. |
| (3) | Licence key | Enter the license key you purchased. |