Online help (Pseudo Terminal)
The archive file is compressed in zip format.
Please make a suitable folder, and place all files in the folder you created with the same folder structure.
File organization
| PseudoTerm.exe | "Pseudo Terminal" Application file. |
|---|---|
| PseudoTerm.exe.config | Setting file. |
| ja-JP/PseudoTerm.resources.dll | Japanese resource file. |
Please delete each folder where the application exists.
File
| Load Scenario List | Load the scenario list file. |
|---|---|
| Close Scenario List | Close the scenario list file. |
| Create Scenario | |
| Edit Scenario | |
| Create Scenario List | |
| Edit Scenario List | |
| Setting | Make application settings for the application. |
| Exit | Exit the application. |
Help
| Help Topics | Open the online help page. |
|---|---|
| Choose Language |
Select the display language of the application as "English" or "Japanese". |
| About Pseudo Terminal |
Displays application version information. 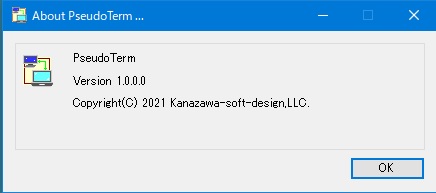
|
| To Keep Using ... |
Enter the license key. |
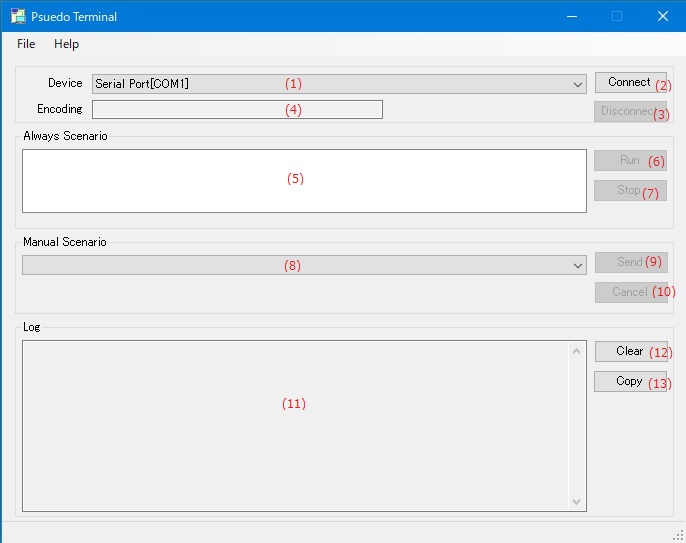
| (1) | Device |
Select the communication port for data communication. |
| (2) | "Connect" button | Open the communication device. |
| (3) | "Disconnect" button | Close the communication device. |
| (4) | Encoding | Displays the character code of communication data. |
| (5) | List of Always Scenarios | Displays a list of always scenarios registered in the loaded scenario file. |
| (6) | "Run" button | Starts running the always scenario. |
| (7) | "Stop" button | Stops the execution of the always scenario. |
| (8) | List of Manual Scenarios | Manual scenario list in the scenario list file Displays the title of the scenario list as a selection list. |
| (9) | "Send" button | Executes the scenario selected in the manual scenario list. |
| (10) | "Cancel" button | Suspend the running manual scenario. |
| (11) | Log message list | Display log messages. |
| (12) | "Clear" button | Clears the log message list. |
| (13) | "Copy" button | Copy the contents of the log message list to the clipboard. |
Register and edit scenario list
Create a list of scenario files to use for always and manual scenarios on the main screen.
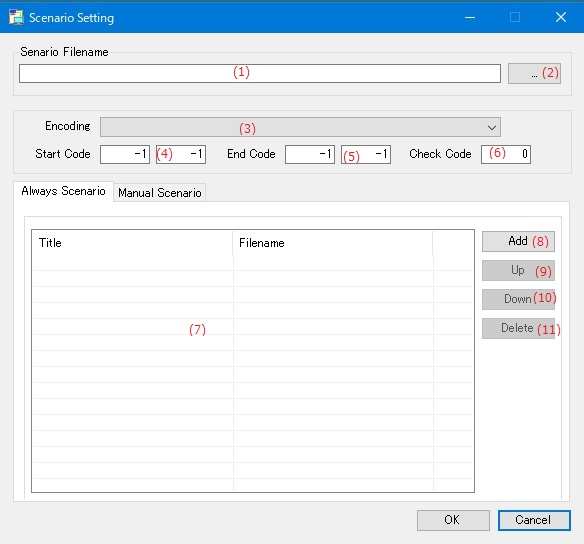
| (1) | Scenario Filename | Enter the file name of the scenario list file to be created. |
| (2) | "..." button | Select a scenario list file name from an existing file. |
| (3) | Encoding |
Select the character code of the communication data. |
| (4) | Start Code |
Specify when a start code for send or receive data such as STX (0x02) is required. |
| (5) | End Code |
Specify this when you need an exit code for send or receive data such as ETX (0x03) or line feed code (0x0D, 0x0A). |
| (6) | Check Code |
Specifies the number of bytes in the checkcode when error checking codes such as checksums and CRC codes are added after the exit code. |
A always scenario runs multiple scenarios at the same time.
The execution order for simultaneous execution is from the beginning of the scenario file list.
In addition, the comparison with the received data is also performed sequentially from the beginning of
the scenario file list, and the comparison is terminated when a matching scenario is detected.
| (7) | Always scenario file list |
|
||||
| (8) | "Add" button | Add an existing scenario file to the scenario file list. |
||||
| (9) | "Up" button |
Moves the selected scenario file in the scenario file list up one line in the list. |
||||
| (10) | "Down" button |
Moves the selected scenario file in the scenario file list down one line in the list. |
||||
| (11) | "Delete" button | Deletes the selected scenario file in the scenario file list from the list. |
The manual scenario is executed by selecting one scenario from multiple scenarios.
The comparison with the received data is performed before the resident scenario,
and if they match, the comparison with the resident scenario is not performed.
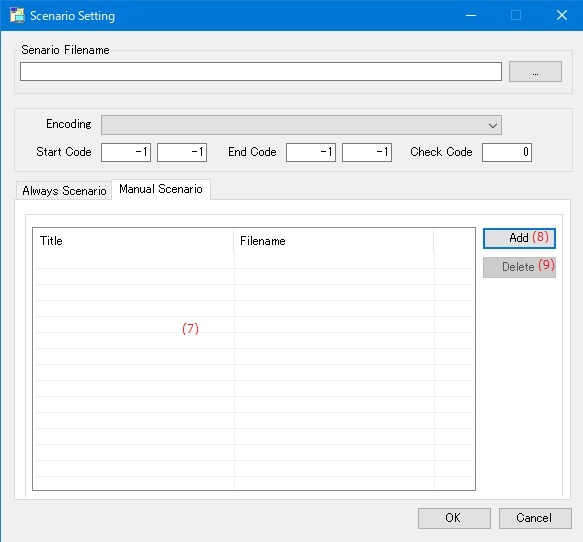
| (7) | Manual scenario file list |
|
||||
| (8) | "Add" button | Add an existing scenario file to the scenario file list. |
||||
| (9) | "Delete" button | Deletes the selected scenario file in the scenario file list from the list. |
Register a sequence of send and receive commands as a "scenario".
(In this application, actions such as data transmission and reception are called "actions", and a collection of actions is called a "scenario".)
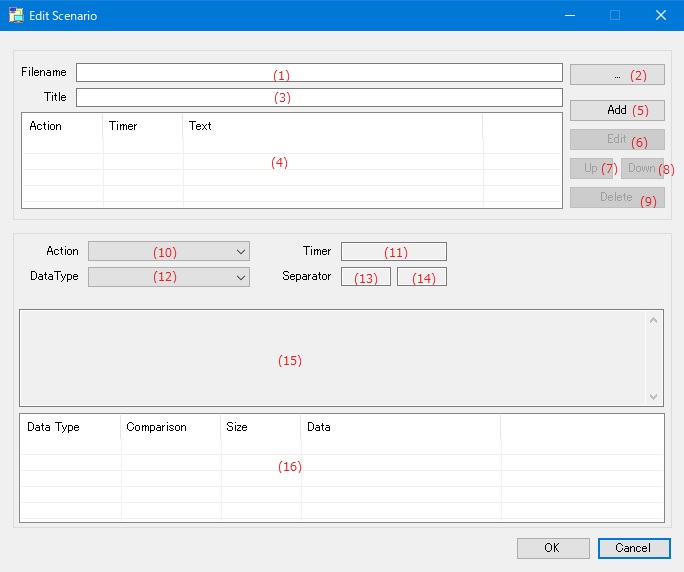
| (1) | Filename | Enter the file name of the scenario file to be created. |
||||||
| (2) | "..." button | Select a scenario file name from an existing file. |
||||||
| (3) | Title | Sets the title of this scenario to be displayed in the scenario list. |
||||||
| (4) | Action list |
|
||||||
| (5) | "Add" button | Add the contents of the action settings to the end of the action list. |
||||||
| (6) | "Edit" button | Overwrites the contents of the action setting with the action selected in the action list. |
||||||
| (7) | "Up" button | Moves the selected action in the action list up one line in the list. |
||||||
| (8) | "Down" button | Moves the selected action in the action list down one line in the list. |
||||||
| (9) | "Delete" button | Deletes the action selected in the action list. |
Action settings
Edit the action settings.
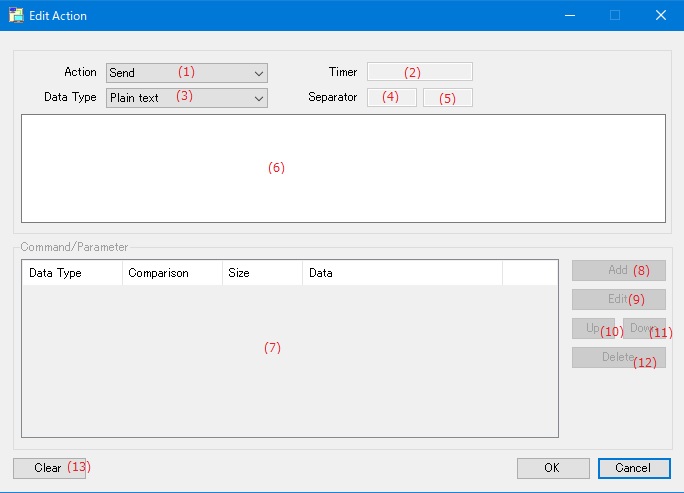
| (1) | Action |
Select the action type of the scenario from the following items.
|
||||||||||
| (2) | Timer |
When the action type is "Receive", specify the time for the reception wait timeout in (seconds). |
||||||||||
| (3) | Data type |
Select the data type of the parameter to be added to the action from the following items.
|
||||||||||
| (4) | Separator |
Sets the delimiter between the command and the parameter. |
||||||||||
| (5) | Separator |
Sets the delimiter between parameters. |
||||||||||
| (6) | Plain text |
If the data type is "Plain Text", enter the character string to be sent or received.
|
||||||||||
| (7) | Command / parameter list |
Select the action type of the scenario from the following items.
|
||||||||||
| (8) | "Add" button | Add a new parameter to the command and parameter list. |
||||||||||
| (9) | "Edit" button | Edit the parameter settings selected in the command / parameter list. |
||||||||||
| (10) | "Up" button | Moves the parameter selected in the command and parameter list up one line in the list. |
||||||||||
| (11) | "Down" button | Moves the parameter selected in the command and parameter list down one line in the list. |
||||||||||
| (12) | "Delete" button | Deletes the parameter selected in the command and parameter list. |
||||||||||
| (13) | "Clear" button | Clears all the action settings currently being entered. |
Sets the command or parameter string.
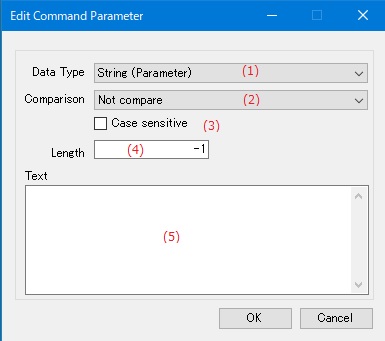
| (1) | Data Type |
Select the data type of the command or parameter from the following items.
|
||||||||||||||||||||||
| (2) | Comparison |
Select the method to compare the command or parameter with the data received from
the other party when the action type is "Receive" from the following items.
|
||||||||||||||||||||||
| (3) | Case sensitive |
If checked, the comparison is case sensitive. |
||||||||||||||||||||||
| (4) | Length |
Specifies the number of bytes if the command or parameter has a fixed number of characters. |
||||||||||||||||||||||
| (5) | Text |
Sets the command or parameter string.
If the command and parameter data type is "Current Date & Time (parameter)", specify the date and time display format. * The format is the same as the format that can be specified by the ToString() method of C#.
|
Set the communication port, etc.
Serial port
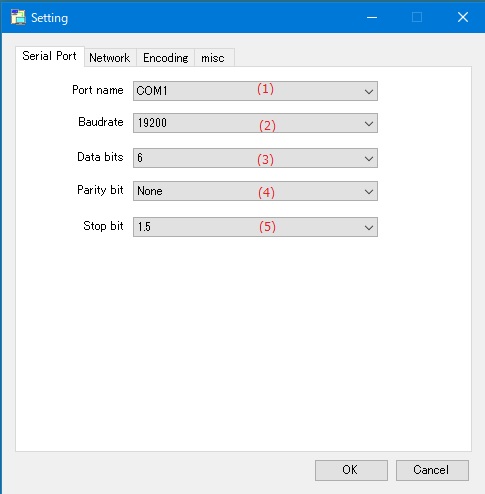
| (1) | Port name | Select the name of the serial port (COM1, COM2, ...) to be set. |
| (2) | Baudrate | Select the communication speed of the serial port. |
| (3) | Data bits | Select the number of bits for sending and receiving data. |
| (4) | Parity bit | Select the parity bit method. |
| (5) | Stop bit | Select the number of stop bits. |
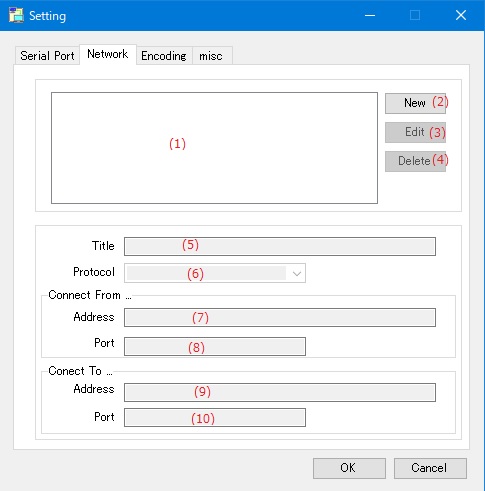
Configured network port
| (1) | Network port list | Displays a list of configured network ports. |
| (2) | "New" button | Adds the contents entered in the network port settings to the network port list. |
| (3) | "Edit" button | Change the setting of the network port selected in the network port list. |
| (4) | "Delete" button | Deletes the network port setting selected in the network port list. |
Network port details selected in the network port list
| (5) | Title | |
| (6) | Protocol |
The communication protocol used by the network port. |
| (7) | (Connect From) Address |
The IP address of the network port used by "Psuedo Terminal". |
| (8) | (Connect From) Port |
The Port number of the network port used by "Psuedo Terminal". |
| (9) | (Connect To) Addressn |
The IP address to connect to. |
| (10) | (Connect To) Port |
The port number to connect to. |
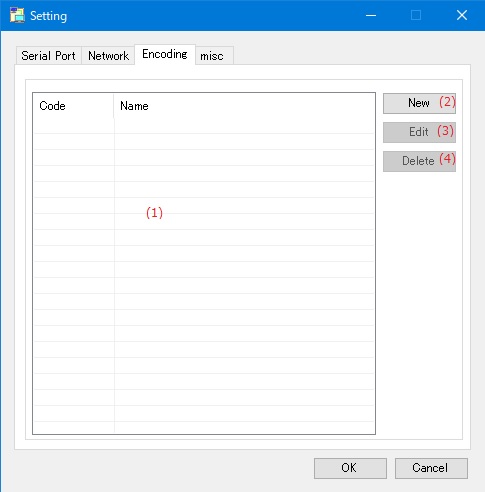
| (1) | Character code list | Displays a list of correspondence between the code page number of the character code and the display name. |
| (2) | "Add" button | Add a new code page to the character code list. |
| (3) | "Edit" button | Change the setting of the code page selected in the character code list. |
| (4) | "Delete" button | Deletes the setting of the code page selected in the character code list. |
misc
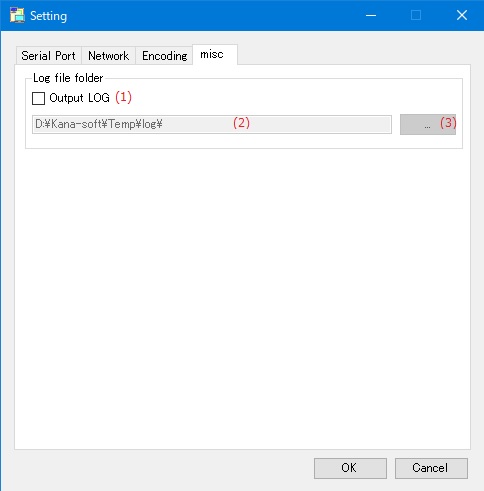
Log file folder
| (1) | Output LOG |
If checked, a log file will be created and the log will be output to a file.
|
||||||||||||
| (2) | Log file storage folder name | Set the name of the folder where the log file is stored. |
||||||||||||
| (3) | "..." button | Select the name of the folder where the log file is stored from the existing folders. |
Set the network port.
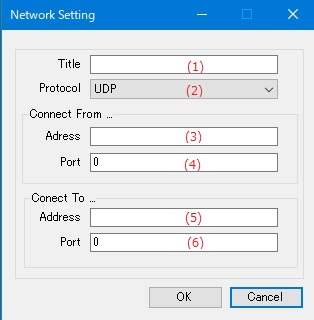
| (1) | Title | Set the name to be displayed in the list of network ports. |
||||||
| (2) | Protocol |
Select the communication protocol used for the network port from the following items.
|
||||||
| (3) | (Connect From) Address |
Set the IP address of the network port used by "Psuedo Terminal". |
||||||
| (4) | (Connect From) Port |
Set the port number of the network port used by "Psuedo Terminal". |
||||||
| (3) | (Connect To) Address |
Set the IP address of the connection destination. |
||||||
| (4) | (Connect To) Port |
Set the port number of the connection destination. |
Set the code page to be added / edited to the character code list and the display name.
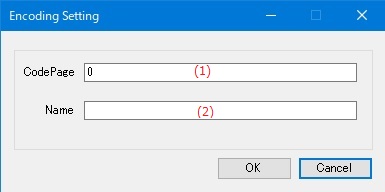
| (1) | Code page |
Enter the code page number of the character code to be displayed. |
| (2) | Name |
Enter the name displayed in the character code selection list. |
Set the display language of the application.
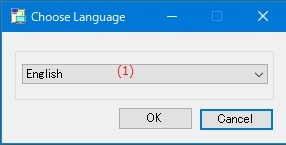
| (1) | Choose Language |
Select the display language of the application from the following languages.
|
Enter the application license key.
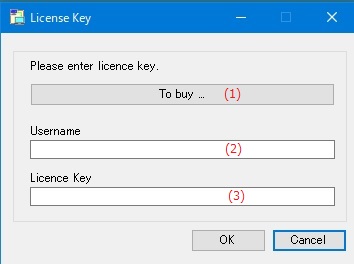
| (1) | "To Buy ..." button | Displays the homepage where you can purchase the license key. |
| (2) | Username | Enter the user name to register the license. |
| (3) | Licence key | Enter the license key you purchased. |