Online help (MQTT Monitor)
The archive file is compressed in zip format.
Please make a suitable folder, and place all files in the folder you created with the same folder structure.
File organization
| MqttMonitor.exe | "MQTT Monitor" Application file. |
|---|---|
| MqttMonitor.exe.config | Setting file. |
| MQTTnet.dll | MQTTnet DLL file. |
| ja-JP/MqttMonitor.resources.dll | Japanese resource file. |
Please delete each folder where the application exists.
File
| Add Publisher |
Add Publisher (message sending port) port. |
|---|---|
| Add Subscriber |
Add a Subscriber (message receiving port) port. |
| Setting | Make application settings for the application. |
| Exit | Exit the application. |
Help
| Help Topics | Open the online help page. |
|---|---|
| Choose Language |
Select the display language of the application as "English" or "Japanese". |
| About MQTT Monitor |
Displays application version information. 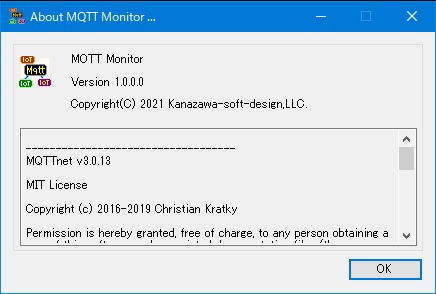
|
| To Keep Using ... |
Enter the license key. |
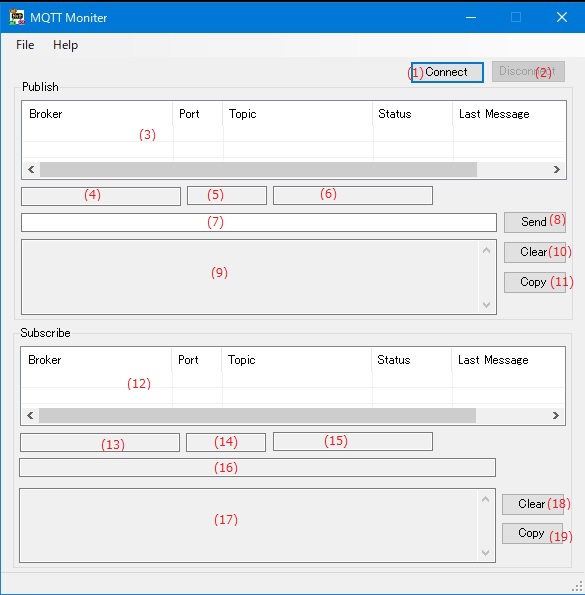
| (1) | [Connect] button | Starts communication with the MQTT broker. |
| (2) | [Disconnect] button | Terminates communication with the MQTT broker. |
Publish
| (3) | Publisher list |
|
||||||||||
| (4) | Address of the broker | Shows the address of the broker to which the Publisher is selected in the Publisher list. |
||||||||||
| (5) | Broker port number | Shows the port number of the broker to which the Publisher is selected in the Publisher list. |
||||||||||
| (6) | Topics | Shows the topic to connect to the Publisher selected in the Publisher list. |
||||||||||
| (7) | Message to send | Enter the message to send from the Publisher selected in the Publisher list. |
||||||||||
| (8) | [Send] button | Sends the string entered in the outgoing message from the Publisher selected in the Publisher list to the MQTT broker. |
||||||||||
| (9) | View send log | Shows the send log of the Publisher selected in the Publisher list. |
||||||||||
| (10) | [Clear] button | Clears the send log of the Publisher selected in the Publisher list. |
||||||||||
| (11) | [Copy] button | Copy the send log of the Publisher selected in the Publisher list to the clipboard. |
Subscribe
| (12) | Subscriber list |
|
||||||||||
| (13) | Address of the broker | Shows the address of the broker to which the Subscriber is selected in the Subscriber list. |
||||||||||
| (14) | Broker port number | Shows the port number of the broker to which the Subscriber is selected in the Subscriber list. |
||||||||||
| (15) | Topics | Shows the topic to connect to the Subscriber selected in the Subscriber list. |
||||||||||
| (16) | Received message file | Shows the file name where the selected Subscriber saves the message received from the MQTT broker. |
||||||||||
| (17) | View received log | Shows the received log of the Subscriber selected in the Subscriber list. |
||||||||||
| (18) | [Clear] button | Clears the received log of the Subscriber selected in the Subscriber list. |
||||||||||
| (19) | [Copy] button | Copy the received log of the Subscriber selected in the Subscriber list to the clipboard. |
Publisher list
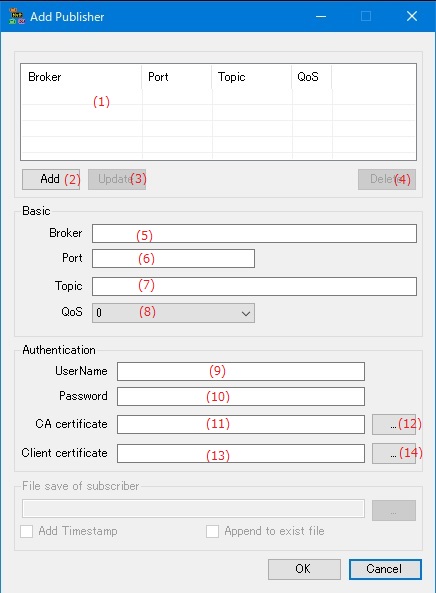
| (1) | Publisher list |
|
||||||||
| (2) | [Add] button | Add a new Publisher entered in [Basic] and [Authentication] to the Publisher list. |
||||||||
| (3) | [Update] button | Updates the Publisher settings selected in the Publisher list to the information entered in [Basic] and [Authentication]. |
||||||||
| (4) | [Delete] button | Delete the selected Publisher from the list. |
Basic
| (5) | Broker | Enter the address of the MQTT broker to which the Publisher connects. |
| (6) | Port | Enter the port number of the MQTT broker to which Publisher connects. |
| (7) | Topic | Enter the topic name of the MQTT broker that Publisher connects to. |
| (8) | QoS | Select Publisher QoS. |
Authentication
| (9) | UserName | If a user name is required when connecting to the MQTT broker to connect to, specify the user name. |
| (10) | Password | If a password is required to connect to the MQTT broker to connect to, specify the user name. |
| (11) | CA certificate | Specify the CA certificate file set in the MQTT broker to connect to. |
| (12) | [...] button on CA certificate | Select the CA certificate file from the existing files. |
| (13) | Client certificate | Specify the client certificate file created from the CA certificate set in the MQTT broker to be connected. |
| (14) | [...] button on Client certificate | Select the client certificate file from the existing files. |
Subscriber list
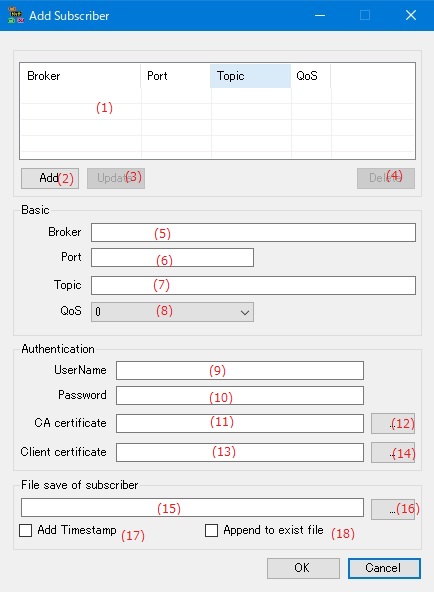
| (1) | Subscriber list |
|
||||||||
| (2) | [Add] button | Add a new Subscriber entered in [Basic] and [Authentication] to the Subscriber list. |
||||||||
| (3) | [Update] button | Updates the Subscriber settings selected in the Subscriber list to the information entered in [Basic] and [Authentication]. |
||||||||
| (4) | [Delete] button | Delete the selected Subscriber from the list. |
Basic
| (5) | Broker | Enter the address of the MQTT broker to which the Subscriber connects. |
| (6) | Port | Enter the port number of the MQTT broker to which Subscriber connects. |
| (7) | Topic | Enter the topic name of the MQTT broker that Subscriber connects to. |
| (8) | QoS | Select Subscriber QoS. |
Authentication
| (9) | UserName | If a user name is required when connecting to the MQTT broker to connect to, specify the user name. |
| (10) | Password | If a password is required to connect to the MQTT broker to connect to, specify the user name. |
| (11) | CA certificate | Specify the CA certificate file set in the MQTT broker to connect to. |
| (12) | [...] button on CA certificate | Select the CA certificate file from the existing files. |
| (13) | Client certificate | Specify the client certificate file created from the CA certificate set in the MQTT broker to be connected. |
| (14) | [...] button on Client certificate | Select the client certificate file from the existing files. |
File save to Subscriber
| (15) | Save file name | Enter the file name to save the message received by Subscriber. |
| (16) | [...] button | Select a file name to save the message received by Subscriber from the existing file name. |
| (17) | Add Timestamp |
If checked, the date and time received when saving the message received by Subscriber to a file is added as a time stamp. |
| (18) | Append to exist file |
If checked, the message received by Subscriber will be saved. If the file already exists, the message received at the end of the file will be saved while keeping the contents of the current file. |
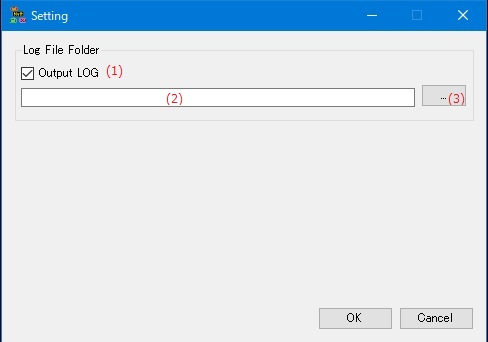
Log file folder
| (1) | Output LOG |
If checked, a log file will be created and the log will be output to a file.
|
||||||||||||
| (2) | Log file storage folder name | Set the name of the folder where the log file is stored. |
||||||||||||
| (3) | [...] button | Select the name of the folder where the log file is stored from the existing folders. |
Set the display language of the application.
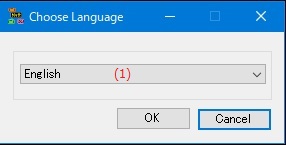
| (1) | Choose Language |
Select the display language of the application from the following languages.
|
Enter the application license key.
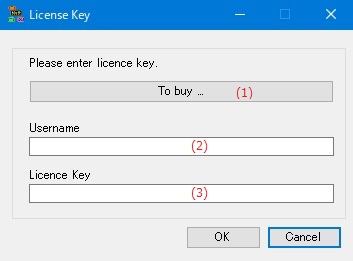
| (1) | [To Buy ...] button/td> | Displays the homepage where you can purchase the license key. |
| (2) | Username | Enter the user name to register the license. |
| (3) | Licence key | Enter the license key you purchased. |